discovery-listicles
10 Picnic Recipes for a Delicious and Healthy Outing

Planning a picnic? Make it an unforgettable outing with these 10 delicious and healthy recipes that are perfect for enjoying outdoors. Whether you’re packing a basket for a romantic date, a family adventure, or a day out with friends, these easy-to-prepare dishes will satisfy your cravings without weighing you down. From refreshing salads to hearty wraps and light bites, each recipe is designed to be both nutritious and flavorful, ensuring that your picnic is as enjoyable as it is wholesome. Get ready to pack your basket and savor the best of nature with these picnic-perfect treats!
Egg & cress club sandwich
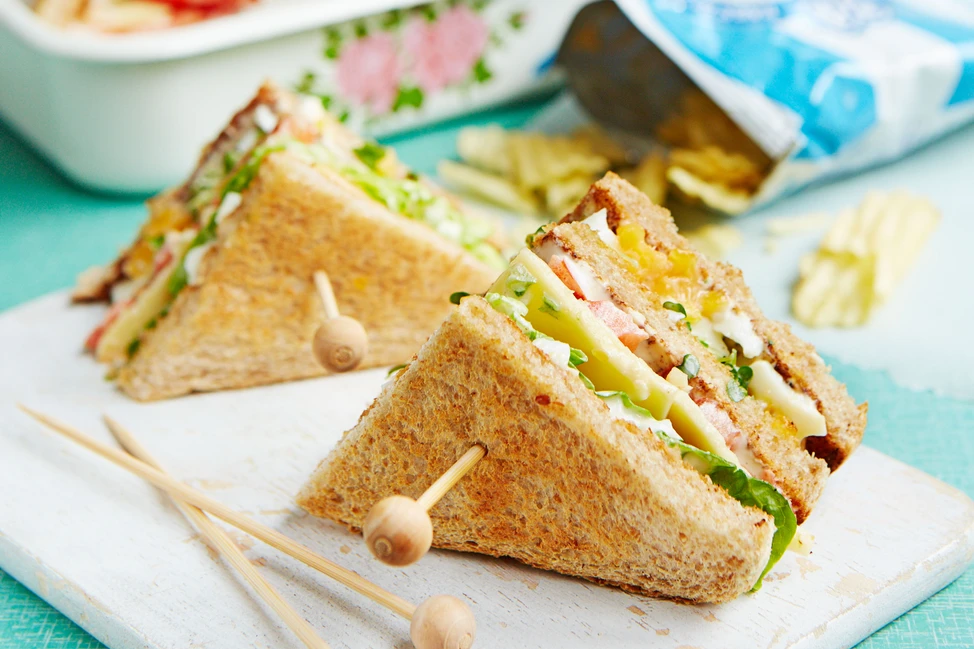
Those who enjoy classic flavors will appreciate these hearty club sandwiches. Be sure to secure each layer with a skewer for easy transport and serving.
Ingredients:
- 6 slices of whole grain bread
- 4 large eggs
- 2 tbsp mayonnaise
- 1 tsp Dijon mustard
- Salt and pepper to taste
- A handful of fresh cress (or watercress)
- 1 ripe tomato, thinly sliced
- 1 small cucumber, thinly sliced
- 4-6 slices of cooked bacon (optional)
- Butter or margarine, for spreading
Instructions:
- Boil the Eggs:
- Place the eggs in a saucepan and cover with cold water. Bring to a boil, then reduce the heat and simmer for 8-10 minutes. Once cooked, transfer the eggs to a bowl of cold water to cool. Peel and chop the eggs into small pieces.
- Prepare the Egg Mixture:
- In a bowl, mix the chopped eggs with mayonnaise, Dijon mustard, salt, and pepper. Stir until well combined.
- Assemble the Sandwiches:
- Lightly toast the bread slices. Spread butter or margarine on one side of each slice.
- Layer the first slice of bread with half of the egg mixture, followed by a few slices of tomato and cucumber. Add some fresh cress on top.
- Place a second slice of bread on top, buttered side down. Spread the remaining egg mixture over this slice, then add more tomato, cucumber, and cress.
- If using bacon, add it on top for extra flavor and crunch.
- Finish with the third slice of bread, buttered side down.
- Secure and Serve:
- Secure each sandwich stack with skewers and slice into halves or quarters. Wrap tightly if transporting, or serve immediately.
Enjoy this fresh and tasty sandwich that’s perfect for a light meal or picnic!
Fig & serrano ham picnic bread
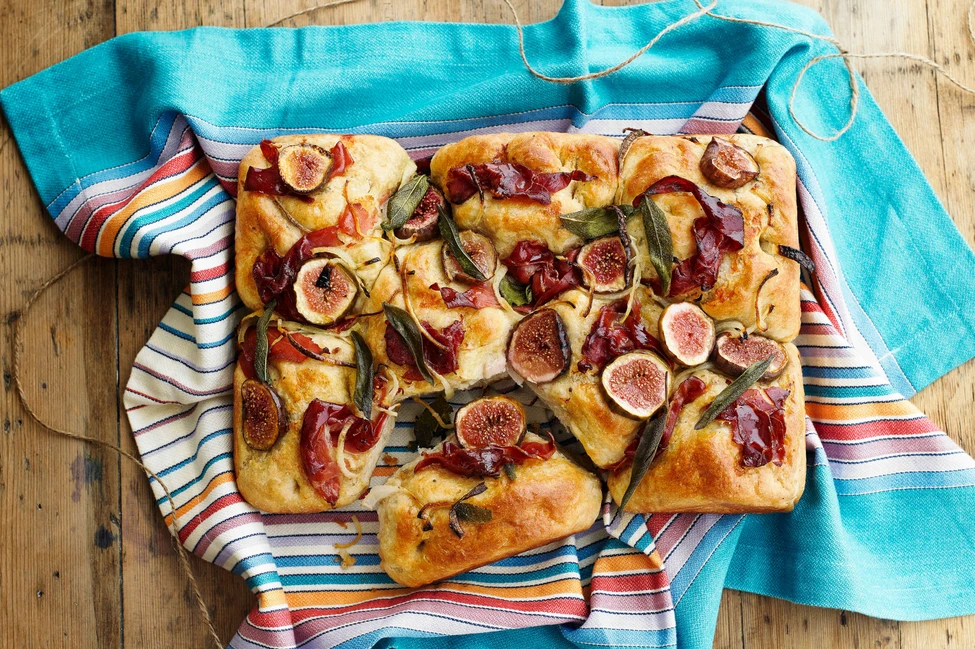
Looking to try something different than the usual picnic sandwich? Swap it out for a fully loaded flatbread instead. Thick slices of fresh figs create a picture-perfect topping on this ciabatta-style loaf. The sweet, fruity taste pairs beautifully with earthy sage leaves, tangy onion, and the savory, umami flavor of Serrano ham.
Ingredients:
- 1 ciabatta loaf (or a large flatbread)
- 4-6 fresh figs, thickly sliced
- 100g (3.5 oz) Serrano ham slices
- 1 small red onion, thinly sliced
- A handful of fresh sage leaves
- 150g (5.3 oz) soft goat cheese or ricotta
- 2 tbsp olive oil
- 1 tbsp balsamic glaze (optional)
- Salt and pepper to taste
Instructions:
- Prepare the Bread Base:
- Preheat your oven to 350°F (180°C).
- Slice the ciabatta loaf in half horizontally, creating a top and bottom layer. Drizzle the cut sides with olive oil and lightly toast in the oven for 5-7 minutes until slightly crispy.
- Assemble the Toppings:
- Spread a generous layer of goat cheese or ricotta on the bottom half of the toasted ciabatta.
- Arrange the Serrano ham slices evenly over the cheese.
- Place the sliced figs on top of the ham, spacing them out so each slice of bread gets a bit of fig.
- Sprinkle the thinly sliced red onion over the figs, followed by the fresh sage leaves.
- Finish and Bake:
- Drizzle a little more olive oil over the top, along with a pinch of salt and pepper.
- Place the assembled bread back in the oven for another 5-10 minutes, until the cheese softens, and the figs begin to caramelize slightly.
- Add Final Touches:
- If using balsamic glaze, drizzle it over the top for a sweet and tangy finish.
- Place the top half of the ciabatta loaf on top, pressing down gently.
- Slice and Serve:
- Slice the picnic bread into smaller portions, wrap tightly in parchment or foil for easy transport, and enjoy at your picnic!
Vegetarian wraps

Bring a DIY twist to your outdoor feast with these veggie flatbreads, packed with roasted vegetables, creamy coconut tzatziki, and a zesty, herby green sauce. Just pack the ingredients in separate containers, and let everyone build their own wraps at the picnic.
Ingredients:
For the Wraps:
- 4 large whole wheat flatbreads or tortillas
- 2 bell peppers (any color), sliced
- 1 zucchini, sliced
- 1 red onion, sliced
- 200g (7 oz) mushrooms, halved
- 2 tbsp olive oil
- 1 tsp smoked paprika
- Salt and pepper to taste
For the Coconut Tzatziki:
- 1 cup plain coconut yogurt (or regular yogurt)
- 1 small cucumber, grated and drained
- 1 garlic clove, minced
- 1 tbsp fresh lemon juice
- 1 tbsp chopped fresh dill or mint
- Salt and pepper to taste
For the Spicy Green Sauce:
- 1 cup fresh cilantro (coriander) leaves
- 1 cup fresh parsley leaves
- 1 jalapeño, seeded and chopped
- 1 garlic clove
- 2 tbsp fresh lime juice
- 3 tbsp olive oil
- Salt to taste
Instructions:
- Roast the Vegetables:
- Preheat your oven to 400°F (200°C).
- Place the sliced bell peppers, zucchini, red onion, and mushrooms on a baking sheet. Drizzle with olive oil, sprinkle with smoked paprika, salt, and pepper, and toss to coat.
- Roast the vegetables in the preheated oven for 20-25 minutes, stirring halfway through, until tender and slightly caramelized.
- Prepare the Coconut Tzatziki:
- In a bowl, combine the coconut yogurt, grated cucumber, minced garlic, lemon juice, and fresh dill or mint. Season with salt and pepper to taste. Stir until well combined. Refrigerate until ready to serve.
- Make the Spicy Green Sauce:
- In a food processor or blender, combine the cilantro, parsley, jalapeño, garlic, lime juice, olive oil, and salt. Blend until smooth, adjusting seasoning as needed.
- Assemble the Wraps:
- Lay out the flatbreads or tortillas. Spread a layer of coconut tzatziki over each one.
- Add a generous portion of the roasted vegetables on top.
- Drizzle with the spicy green sauce.
- Wrap tightly and cut in half, or pack the ingredients separately and allow everyone to assemble their own wraps at the picnic.
- Serve:
- If transporting, pack the wraps in parchment paper or foil to keep them secure and fresh.
Fish finger hot dogs

This delicious spin on the classic fish finger sandwich is a must-have picnic treat. The lightly salted homemade fish fingers pair perfectly with the sweetness of the brioche and the tangy bite of gherkins and lemon.
Ingredients:
- 4 brioche hot dog buns
- 400g (14 oz) white fish fillets (e.g., cod, haddock), cut into finger-sized pieces
- 1 cup breadcrumbs (panko or regular)
- 1/2 cup flour
- 1 large egg, beaten
- 1 tsp paprika
- 1/2 tsp garlic powder
- Salt and pepper to taste
- 2 tbsp olive oil (for frying)
- 4 small gherkins, thinly sliced
- 1 lemon, cut into wedges
- Optional: tartar sauce, lettuce, or coleslaw for serving
Instructions:
- Prepare the Fish Fingers:
- Set up a breading station with three shallow bowls: one with flour, one with beaten egg, and one with breadcrumbs mixed with paprika, garlic powder, salt, and pepper.
- Dip each fish fillet piece into the flour, then the egg, and finally coat it in the seasoned breadcrumbs.
- Cook the Fish Fingers:
- Heat the olive oil in a large frying pan over medium heat. Cook the breaded fish fingers for 2-3 minutes on each side until golden brown and cooked through. Drain on paper towels.
- Assemble the Hot Dogs:
- Lightly toast the brioche buns, if desired.
- Place 2-3 fish fingers into each bun.
- Top with sliced gherkins, a squeeze of fresh lemon juice, and optional toppings like tartar sauce, lettuce, or coleslaw.
- Serve:
- Wrap the hot dogs in parchment or foil for easy transportation if taking them to a picnic, or serve them immediately.
Epic summer salad
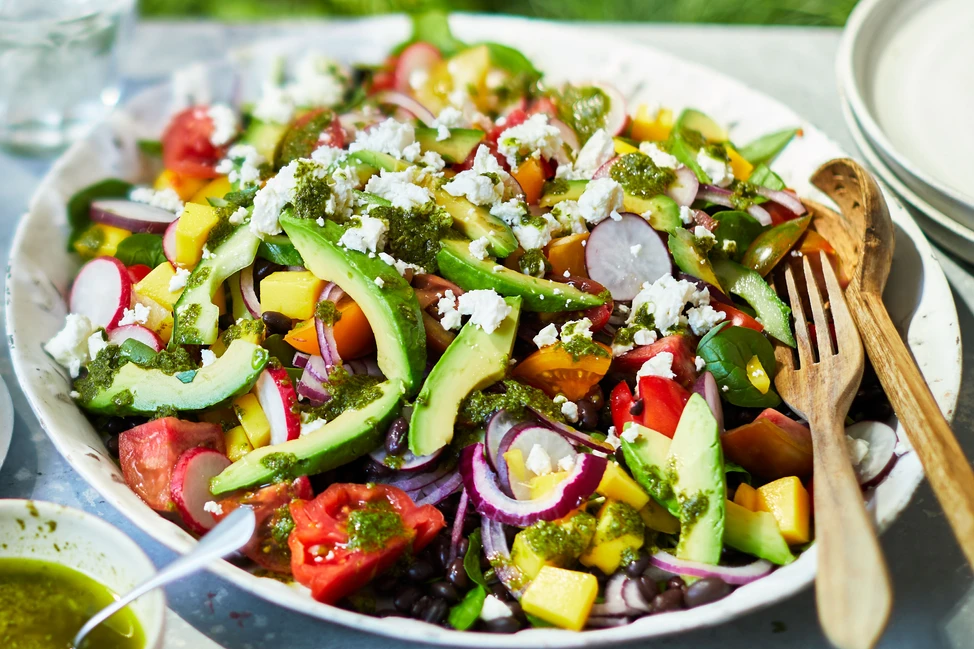
Living up to its name, this epic sharing salad is packed with fresh ingredients like tomatoes, avocados, spinach, mango, and cucumber, all tossed in a zesty herb dressing and finished with crumbled feta. It’s quick to assemble, requires no cooking, and is perfect for serving a picnic group of six (though you can easily scale it down).
Ingredients:
- 2 cups fresh spinach
- 1 cup cherry tomatoes, halved
- 1 ripe avocado, diced
- 1 cup cucumber, sliced
- 1 ripe mango, peeled and diced
- 100g (3.5 oz) feta cheese, crumbled
- 1/4 cup fresh basil leaves, chopped (or fresh mint)
- 1/4 cup fresh parsley, chopped
For the Herb Dressing:
- 1/4 cup olive oil
- 2 tbsp lemon juice
- 1 tbsp apple cider vinegar
- 1 tsp honey or maple syrup
- 1 clove garlic, minced
- 1 tsp dried oregano
- Salt and pepper to taste
Instructions:
- Prepare the Salad Ingredients:
- In a large salad bowl, combine the spinach, cherry tomatoes, avocado, cucumber, and mango.
- Make the Herb Dressing:
- In a small bowl or jar, whisk together the olive oil, lemon juice, apple cider vinegar, honey or maple syrup, minced garlic, dried oregano, salt, and pepper until well combined.
- Assemble the Salad:
- Drizzle the herb dressing over the salad and toss gently to combine.
- Sprinkle the crumbled feta cheese over the top, along with the chopped basil and parsley.
- Serve:
- Serve immediately, or cover and refrigerate until ready to serve.
Curried rice & egg salad

Egg salad is a classic picnic favorite. Give it a family-friendly twist with turmeric rice, raisins, and toasted almonds. Add grated carrots and cucumbers for extra texture, and you’ve got a simple yet tasty picnic side dish.
Ingredients:
- 1 cup cooked jasmine or basmati rice
- 4 large eggs
- 1/2 cup raisins
- 1/4 cup toasted almonds, chopped
- 1 cup grated carrots
- 1/2 cup diced cucumber
- 2 tbsp curry powder
- 1/4 cup mayonnaise
- 1/4 cup Greek yogurt (or extra mayonnaise)
- 1 tbsp lemon juice
- Salt and pepper to taste
- Fresh cilantro or parsley for garnish (optional)
Instructions:
- Cook the Eggs:
- Place the eggs in a saucepan and cover with cold water. Bring to a boil, then reduce heat and simmer for 10 minutes. Transfer the eggs to a bowl of ice water to cool. Peel and chop them into small pieces.
- Prepare the Rice:
- If not already cooked, prepare the rice according to package instructions. Allow it to cool before using.
- Make the Dressing:
- In a large bowl, mix together the mayonnaise, Greek yogurt, curry powder, lemon juice, salt, and pepper until well combined.
- Assemble the Salad:
- Add the cooked rice, chopped eggs, raisins, toasted almonds, grated carrots, and diced cucumber to the bowl with the dressing. Gently fold everything together until well mixed.
- Chill and Serve:
- Cover the salad and refrigerate for at least 30 minutes to allow the flavors to meld. Garnish with fresh cilantro or parsley, if desired, before serving.
Summer sausage rolls

A refreshing take on classic sausage rolls, featuring a chicken and bacon filling infused with sundried tomatoes, garlic, and basil.
Ingredients:
- 1 sheet of puff pastry (thawed if frozen)
- 200g (7 oz) chicken breast, finely chopped
- 100g (3.5 oz) bacon, diced
- 1/4 cup sundried tomatoes, finely chopped
- 2 cloves garlic, minced
- 2 tbsp fresh basil, chopped (or 1 tbsp dried basil)
- 1/4 cup grated Parmesan cheese (optional)
- 1 egg, beaten (for egg wash)
- Salt and pepper to taste
Instructions:
- Prepare the Filling:
- In a large bowl, combine the finely chopped chicken breast, diced bacon, chopped sundried tomatoes, minced garlic, fresh basil, and Parmesan cheese if using. Season with salt and pepper, and mix well.
- Assemble the Sausage Rolls:
- Preheat your oven to 400°F (200°C).
- Roll out the puff pastry sheet on a lightly floured surface. Cut the pastry into rectangles, about 4 inches wide and 6 inches long.
- Place a spoonful of the filling along one edge of each pastry rectangle, leaving a small border.
- Roll up the pastry over the filling to form a log. Seal the edges by pressing them together and place seam-side down on a baking sheet lined with parchment paper.
- Brush the tops of the sausage rolls with the beaten egg for a golden finish.
- Bake:
- Bake in the preheated oven for 15-20 minutes, or until the pastry is golden and crisp, and the filling is cooked through.
- Serve:
- Allow the sausage rolls to cool slightly before serving. They are delicious warm or at room temperature, making them perfect for picnics.
Cheese & pesto whirls

These herby tear-and-share bread rolls are simple to prepare and filled with irresistible mozzarella and sundried tomatoes. They’re sure to be a hit with the kids.
Ingredients:
- 1 sheet of puff pastry (thawed if frozen)
- 1/4 cup basil pesto
- 1 cup grated mozzarella cheese
- 1/4 cup grated Parmesan cheese
- 1 egg, beaten (for egg wash)
- Salt and pepper to taste
Instructions:
- Prepare the Puff Pastry:
- Preheat your oven to 400°F (200°C).
- Roll out the puff pastry sheet on a lightly floured surface to smooth out creases.
- Assemble the Whirls:
- Spread a thin layer of basil pesto evenly over the puff pastry.
- Sprinkle the grated mozzarella and Parmesan cheese over the pesto.
- Season with a bit of salt and pepper if desired.
- Roll and Slice:
- Starting from one edge, carefully roll the pastry into a tight log or cylinder.
- Slice the roll into 1-inch (2.5 cm) pieces.
- Bake:
- Place the slices on a baking sheet lined with parchment paper, spacing them a little apart.
- Brush the tops with the beaten egg to give them a golden finish.
- Bake in the preheated oven for 12-15 minutes, or until the pastry is golden and the cheese is melted and bubbly.
- Serve:
- Allow the whirls to cool slightly before serving. They are perfect warm or at room temperature for snacking or as part of a party platter.
Apple ‘doughnuts’

Give these fun, fruity apple rings a try for a healthier alternative to traditional doughnuts. Kids will enjoy helping to make and decorate them with nut butter, soft cheese, and sprinkles. Pack them in a small box lined with baking parchment for a light and delightful picnic treat.
Ingredients:
- 2 large apples (such as Honeycrisp or Fuji)
- 1/4 cup nut butter (e.g., almond, peanut)
- 1/4 cup soft cheese (e.g., cream cheese or ricotta)
- 2 tbsp honey or maple syrup
- 1/4 cup granola or crushed nuts (for topping)
- Sprinkles or mini chocolate chips (optional)
- 1/2 tsp cinnamon (optional)
Instructions:
- Prepare the Apples:
- Wash and core the apples. Slice them into 1/2-inch thick rings, removing any seeds.
- Prepare the Toppings:
- In a small bowl, mix the nut butter with honey or maple syrup until smooth.
- In another bowl, stir the soft cheese with a pinch of cinnamon, if using, until well combined.
- Assemble the “Doughnuts”:
- Spread a layer of nut butter on half of the apple rings.
- Spread a layer of soft cheese on the remaining apple rings.
- Place the apple rings with nut butter and cheese together to make pairs.
- Add Toppings:
- Sprinkle granola or crushed nuts on top of the apple rings.
- Add sprinkles or mini chocolate chips for extra fun, if desired.
- Serve:
- Arrange the apple doughnuts on a plate or in a small box lined with baking parchment. Enjoy immediately or pack for a picnic.
Chocolate-dipped strawberries

Elevate a punnet of ripe, juicy strawberries into a decadent treat by drizzling them with rich dark chocolate. Add a touch of milk and white chocolate drizzle for extra indulgence. These are perfect for a romantic picnic or any al fresco gathering.
Ingredients:
- 1 pint fresh strawberries (washed and dried thoroughly)
- 1 cup dark chocolate chips
- 1/2 cup milk chocolate chips
- 1/2 cup white chocolate chips
- Optional: sprinkles, crushed nuts, or sea salt for garnish
Instructions:
- Prepare the Strawberries:
- Wash and thoroughly dry the strawberries. Make sure they are completely dry to ensure the chocolate sticks properly.
- Melt the Chocolate:
- Dark Chocolate: In a microwave-safe bowl, melt the dark chocolate chips in 30-second intervals, stirring after each interval until smooth. Alternatively, melt using a double boiler.
- Milk Chocolate: Repeat the melting process for the milk chocolate chips in a separate bowl.
- White Chocolate: Similarly, melt the white chocolate chips in another bowl.
- Dip the Strawberries:
- Hold each strawberry by the stem and dip it into the melted dark chocolate, coating about two-thirds of the berry. Gently shake off excess chocolate and place the dipped strawberry on a baking sheet lined with parchment paper.
- Repeat the process with the remaining strawberries, dipping them in milk or white chocolate if desired.
- Add Garnishes:
- While the chocolate is still wet, sprinkle the strawberries with optional garnishes such as sprinkles, crushed nuts, or a pinch of sea salt.
- Let the Chocolate Set:
- Allow the chocolate to set at room temperature or place the baking sheet in the refrigerator for about 15-20 minutes until the chocolate is firm.
- Serve:
- Arrange the chocolate-dipped strawberries on a serving platter or pack them carefully for a picnic or gathering.