discovery-listicles
10 Simple Picnic Foods That Everyone Will Love

Picnics are a delightful way to enjoy time outdoors with loved ones, and having the right selection of food can enhance the experience. To make your picnic both memorable and enjoyable, we’ve curated ten simple and crowd-pleasing picnic foods that are sure to appeal to everyone. These recipes are designed to be easy to prepare, transport, and serve, ensuring a stress-free outing. With a variety of flavors and options to suit diverse tastes, these dishes will help you create a satisfying and enjoyable picnic spread that everyone will appreciate.
Vegan cherry & almond brownies
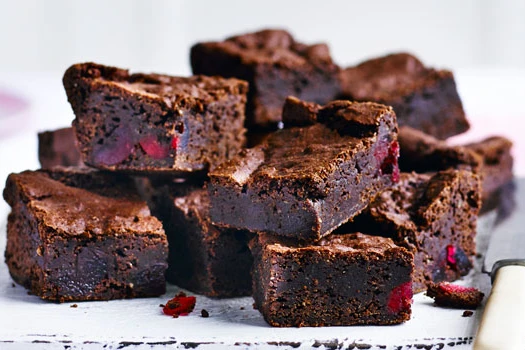
Vegan Cherry & Almond Brownies are rich and fudgy, with the sweet-tart flavor of cherries and the nutty crunch of almonds. They’re perfect for satisfying your sweet tooth while keeping things plant-based!
Ingredients:
- For the Brownies:
- 1 cup pitted cherries (fresh or frozen, thawed and drained)
- 1/2 cup almond meal (or finely ground almonds)
- 1/2 cup all-purpose flour
- 1/2 cup cocoa powder
- 1/2 cup coconut sugar or brown sugar
- 1/2 cup maple syrup or agave syrup
- 1/4 cup coconut oil or vegetable oil
- 1/4 cup almond butter (or other nut butter)
- 1 tsp vanilla extract
- 1/2 tsp baking powder
- 1/4 tsp salt
- 1/4 cup chopped almonds (for topping, optional)
- For the Cherry Swirl (optional):
- 1/2 cup pitted cherries (fresh or frozen, thawed and drained)
- 1 tbsp maple syrup or agave syrup
Instructions:
- Preheat the oven:
- Preheat your oven to 350°F (175°C). Line an 8×8-inch baking pan with parchment paper or lightly grease it.
- Prepare the cherry swirl (optional):
- In a small saucepan, cook the cherries and maple syrup over medium heat until the cherries break down and the mixture thickens, about 5-7 minutes. Set aside to cool.
- Make the brownie batter:
- In a large bowl, whisk together the almond meal, flour, cocoa powder, coconut sugar, baking powder, and salt.
- In a separate bowl, mix the maple syrup, coconut oil, almond butter, and vanilla extract until well combined.
- Add the wet ingredients to the dry ingredients and stir until just combined.
- Gently fold in the pitted cherries.
- Bake the brownies:
- Pour the brownie batter into the prepared baking pan and spread evenly.
- If using, drop spoonfuls of the cherry swirl mixture over the brownie batter and use a toothpick or knife to swirl it through the batter.
- Sprinkle the chopped almonds over the top, if desired.
- Bake for 25-30 minutes, or until a toothpick inserted into the center comes out mostly clean (a few moist crumbs are okay).
- Cool and serve:
- Allow the brownies to cool in the pan for about 10 minutes before transferring to a wire rack to cool completely.
- Cut into squares and enjoy!
Coconut & jam macaroon traybake
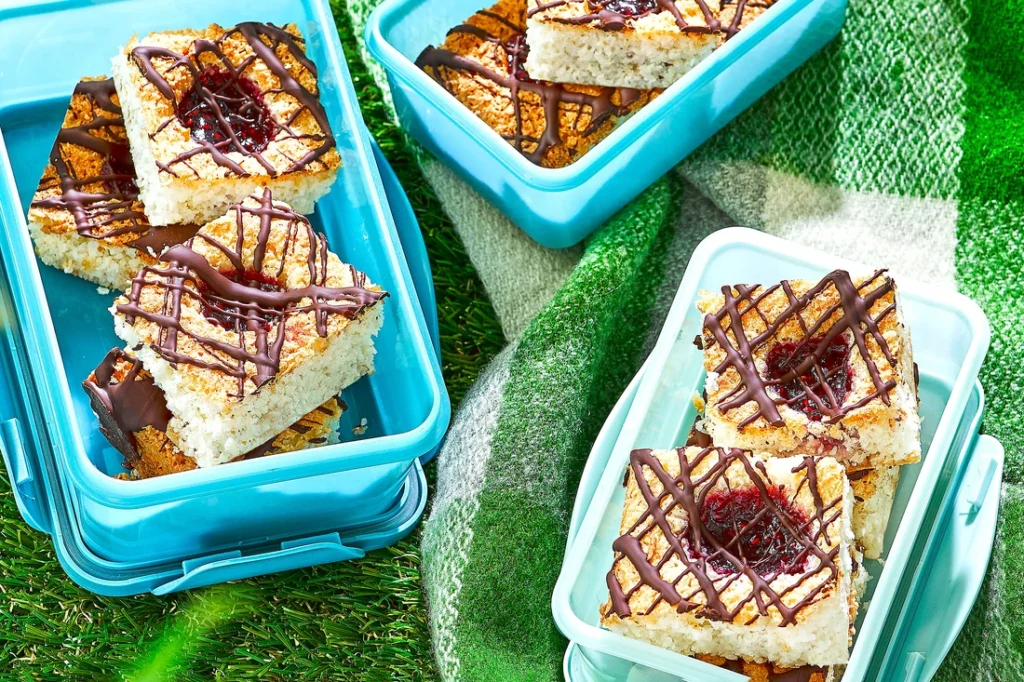
Coconut & Jam Macaroon Traybake is a delightful dessert that combines the chewy texture of coconut macaroons with a sweet jam layer. It’s easy to make and perfect for sharing!
Ingredients:
- For the Base:
- 1 cup (225g) unsalted butter, softened
- 1 cup (200g) granulated sugar
- 2 large eggs
- 1 tsp vanilla extract
- 2 cups (250g) all-purpose flour
- 1/2 tsp baking powder
- 1/4 tsp salt
- For the Coconut Topping:
- 1 cup (85g) shredded unsweetened coconut
- 1/2 cup (100g) granulated sugar
- 1 large egg white
- 1/4 tsp vanilla extract
- For the Jam Layer:
- 1/2 cup (160g) fruit jam or preserves (raspberry, apricot, or your choice)
Instructions:
- Preheat the oven:
- Preheat your oven to 350°F (175°C). Grease and line a 9×13-inch baking pan with parchment paper.
- Prepare the base:
- In a large bowl, cream together the softened butter and granulated sugar until light and fluffy.
- Beat in the eggs one at a time, then mix in the vanilla extract.
- In a separate bowl, whisk together the flour, baking powder, and salt.
- Gradually add the dry ingredients to the wet ingredients, mixing until just combined.
- Spread the base:
- Spread the batter evenly in the prepared baking pan. Smooth the top with a spatula.
- Prepare the coconut topping:
- In a medium bowl, combine the shredded coconut, granulated sugar, egg white, and vanilla extract. Mix until well combined.
- Gently spread the coconut mixture over the base layer in the baking pan.
- Add the jam layer:
- Drop spoonfuls of jam over the coconut topping and use a knife or toothpick to swirl it gently into the coconut mixture.
- Bake:
- Bake in the preheated oven for 25-30 minutes, or until the coconut topping is golden brown and the base is cooked through.
- If the edges start to brown too quickly, cover the pan with foil to prevent burning.
- Cool and serve:
- Allow the traybake to cool completely in the pan on a wire rack.
- Once cooled, lift it out of the pan using the parchment paper and cut into squares.
Rhubarb & custard blondies
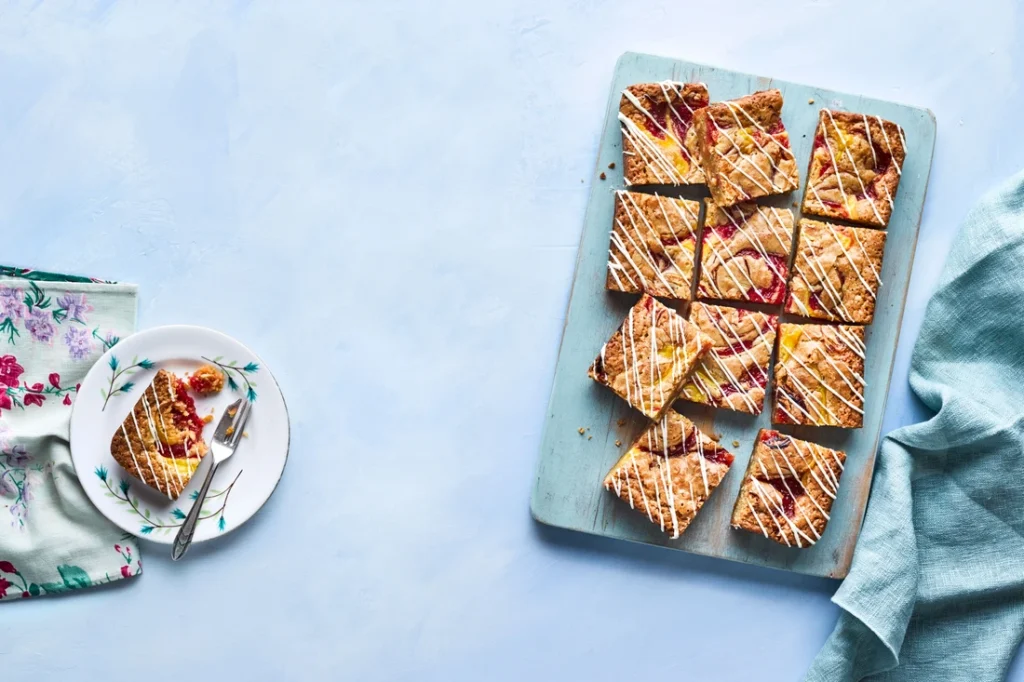
Rhubarb & Custard Blondies are a delicious twist on traditional blondies, combining the tangy flavor of rhubarb with a creamy custard filling. They’re a delightful dessert or snack that’s perfect for rhubarb season!
Ingredients:
For the Blondie Base:
- 1/2 cup (115g) unsalted butter, softened
- 1 cup (200g) brown sugar, packed
- 1 large egg
- 1 tsp vanilla extract
- 1 1/2 cups (190g) all-purpose flour
- 1/2 tsp baking powder
- 1/4 tsp salt
For the Rhubarb Filling:
- 1 1/2 cups (150g) fresh rhubarb, diced into small pieces
- 1/4 cup (50g) granulated sugar
For the Custard Layer:
- 1/2 cup (120ml) heavy cream
- 1 large egg yolk
- 1/4 cup (50g) granulated sugar
- 1 tbsp cornstarch
- 1/2 tsp vanilla extract
Instructions:
- Preheat the oven:
- Preheat your oven to 350°F (175°C). Grease and line an 8×8-inch baking pan with parchment paper.
- Prepare the rhubarb:
- In a small bowl, toss the diced rhubarb with 1/4 cup sugar. Set aside to macerate while you prepare the other components.
- Make the blondie base:
- In a large bowl, cream together the softened butter and brown sugar until light and fluffy.
- Beat in the egg and vanilla extract until well combined.
- In a separate bowl, whisk together the flour, baking powder, and salt.
- Gradually add the dry ingredients to the wet ingredients, mixing until just combined.
- Spread the blondie batter evenly in the prepared baking pan.
- Prepare the custard layer:
- In a small saucepan, heat the heavy cream over medium heat until it’s just about to simmer.
- In a bowl, whisk together the egg yolk, sugar, cornstarch, and vanilla extract.
- Gradually whisk the hot cream into the egg mixture, then return the mixture to the saucepan.
- Cook over medium heat, whisking constantly, until the mixture thickens and begins to bubble. Remove from heat and let cool slightly.
- Assemble the blondies:
- Scatter the macerated rhubarb evenly over the blondie base in the pan.
- Gently spoon the custard mixture over the rhubarb, spreading it out with a spatula.
- Bake:
- Bake in the preheated oven for 30-35 minutes, or until the custard is set and the edges of the blondies are golden brown.
- A toothpick inserted into the center should come out mostly clean, with just a few moist crumbs.
- Cool and serve:
- Allow the blondies to cool completely in the pan on a wire rack before lifting out and cutting into squares.
Tropical rocky road
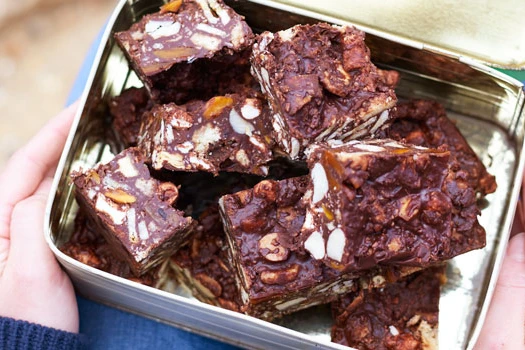
Tropical Rocky Road is a fun and indulgent treat that combines the classic elements of rocky road—chocolate, marshmallows, and nuts—with tropical flavors like coconut, pineapple, and macadamia nuts. It’s a deliciously sweet and chewy dessert that’s perfect for a summer treat or anytime you want something a bit different.
Ingredients:
- 200g (7 oz) dark chocolate, chopped
- 100g (3.5 oz) milk chocolate, chopped
- 2 tbsp unsalted butter
- 1 cup mini marshmallows
- 1 cup shredded unsweetened coconut
- 1/2 cup dried pineapple, chopped into small pieces
- 1/2 cup macadamia nuts, chopped (or use cashews or almonds if preferred)
- 1/4 cup crispy rice cereal (optional, for added crunch)
Instructions:
- Prepare the pan:
- Line an 8×8-inch (20×20 cm) baking pan with parchment paper, leaving an overhang for easy removal.
- Melt the chocolate:
- In a heatproof bowl, melt the dark chocolate, milk chocolate, and butter together over a pot of simmering water (double boiler method). Stir occasionally until smooth and fully melted. Alternatively, you can melt them in the microwave in 30-second intervals, stirring after each interval.
- Mix in the ingredients:
- Remove the bowl from the heat and let it cool slightly.
- Stir in the mini marshmallows, shredded coconut, chopped dried pineapple, macadamia nuts, and crispy rice cereal (if using). Mix until everything is evenly coated with the chocolate.
- Transfer to the pan:
- Pour the mixture into the prepared baking pan and spread it out evenly with a spatula. Press down lightly to ensure it’s packed together.
- Chill and set:
- Refrigerate the rocky road for at least 2 hours, or until set and firm.
- Cut and serve:
- Once set, lift the rocky road out of the pan using the parchment paper overhang. Cut into squares or bars and enjoy!
Blackberry bakewell squares
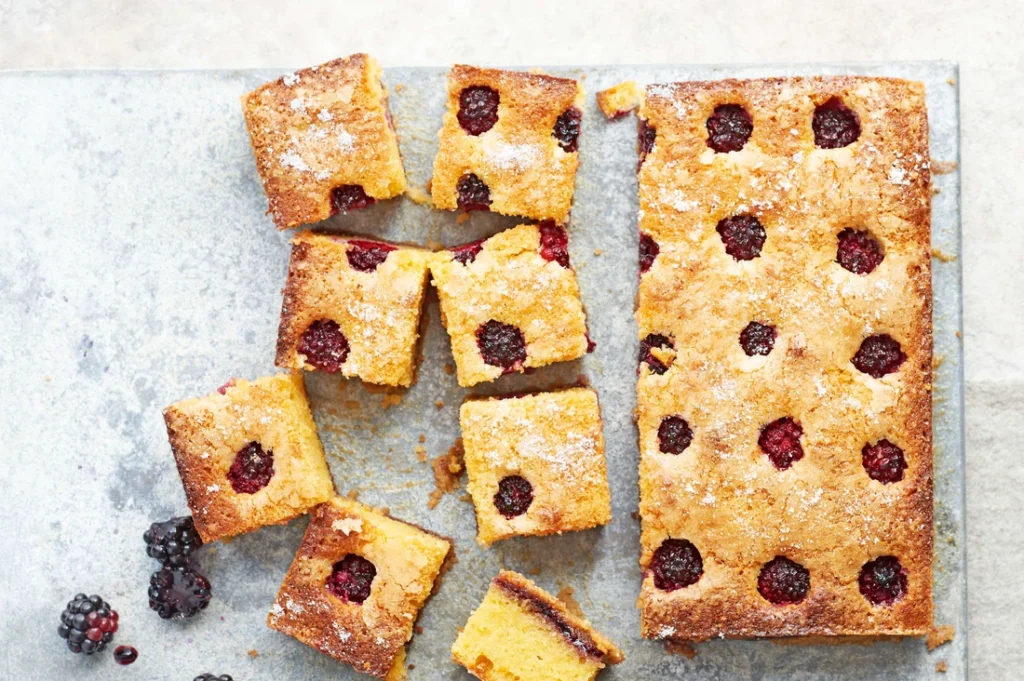
Blackberry Bakewell Squares are a delicious twist on the traditional Bakewell tart, featuring a buttery shortbread base topped with a layer of sweet blackberry jam and almond frangipane. These squares are perfect for a teatime treat or a delightful dessert.
Ingredients:
For the Base:
- 1 cup (225g) unsalted butter, softened
- 1/2 cup (100g) granulated sugar
- 2 cups (250g) all-purpose flour
- 1/4 tsp salt
For the Blackberry Filling:
- 1 cup (250g) blackberry jam or preserves (store-bought or homemade)
For the Almond Frangipane Topping:
- 1/2 cup (115g) unsalted butter, softened
- 1/2 cup (100g) granulated sugar
- 2 large eggs
- 1 cup (100g) ground almonds (almond meal)
- 1/2 cup (60g) all-purpose flour
- 1/2 tsp almond extract
- 1/4 tsp salt
- 1/4 cup (25g) flaked almonds (for topping, optional)
Instructions:
- Preheat the oven:
- Preheat your oven to 350°F (175°C). Grease and line an 8×8-inch (20×20 cm) baking pan with parchment paper, leaving an overhang for easy removal.
- Make the shortbread base:
- In a medium bowl, cream together the softened butter and granulated sugar until light and fluffy.
- Mix in the flour and salt until the dough comes together.
- Press the dough evenly into the bottom of the prepared baking pan to form a smooth, even layer.
- Bake the base:
- Bake the shortbread base in the preheated oven for 15-20 minutes, or until just starting to turn golden. Remove from the oven and let cool slightly.
- Prepare the almond frangipane topping:
- In a large bowl, cream together the softened butter and granulated sugar until light and fluffy.
- Beat in the eggs, one at a time, mixing well after each addition.
- Stir in the ground almonds, flour, almond extract, and salt until well combined.
- Assemble the squares:
- Spread the blackberry jam evenly over the baked shortbread base.
- Spoon the almond frangipane topping over the jam and spread it out evenly with a spatula.
- Bake:
- Return the pan to the oven and bake for an additional 25-30 minutes, or until the frangipane topping is golden brown and set.
- If using, sprinkle flaked almonds on top during the last 10 minutes of baking.
- Cool and cut:
- Allow the bakewell squares to cool completely in the pan on a wire rack.
- Once cooled, lift the squares out of the pan using the parchment paper overhang and cut into squares.
Cucumber, mint & melon punch
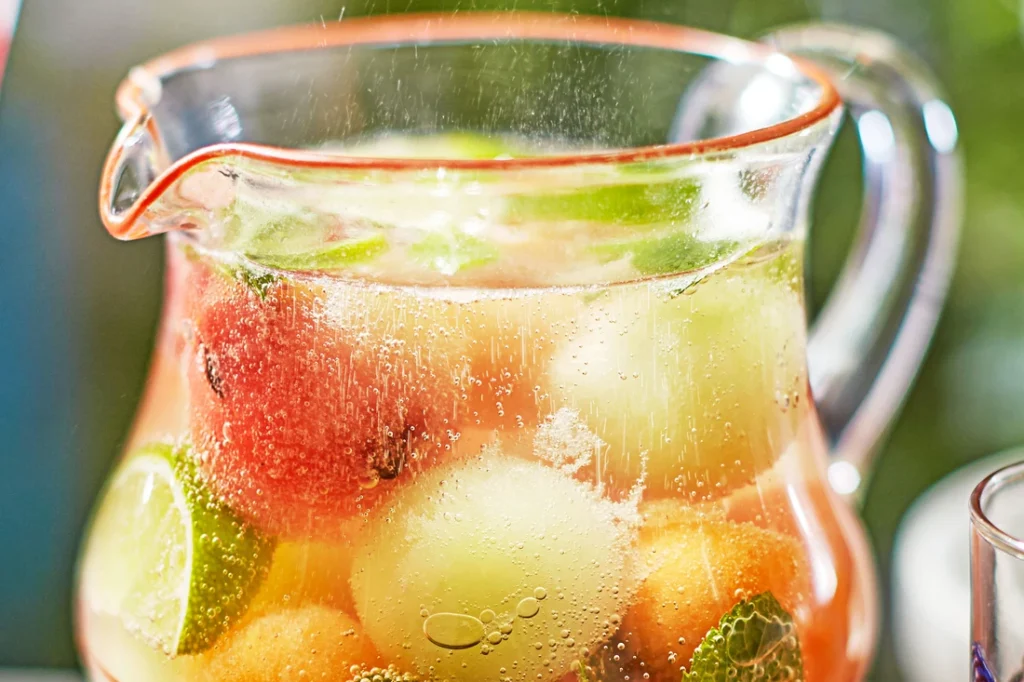
Cucumber, Mint & Melon Punch is a refreshing and light beverage that’s perfect for summer gatherings, picnics, or just a cool treat on a hot day. The combination of crisp cucumber, sweet melon, and fresh mint creates a delightful and hydrating drink.
Ingredients:
- 1/2 large cantaloupe or honeydew melon, peeled, seeded, and cubed
- 1 cucumber, peeled and sliced
- 1/2 cup fresh mint leaves, plus extra for garnish
- 1/4 cup honey or agave syrup (adjust to taste)
- Juice of 1 lime
- 4 cups cold water or sparkling water
- Ice cubes (optional)
Instructions:
- Prepare the melon:
- In a blender, combine the cubed melon and honey or agave syrup. Blend until smooth.
- Strain the melon puree:
- If you prefer a smoother punch, strain the melon puree through a fine-mesh sieve or cheesecloth into a large pitcher to remove any pulp.
- Mix the punch:
- Add the sliced cucumber and fresh mint leaves to the pitcher with the melon puree.
- Pour in the lime juice and cold water or sparkling water. Stir gently to combine.
- Chill and serve:
- Chill the punch in the refrigerator for at least 1 hour to allow the flavors to meld.
- Serve over ice if desired and garnish with additional mint leaves and cucumber slices.
Coconut & pineapple cooler
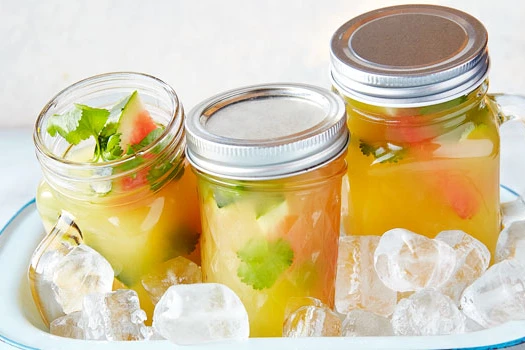
The Coconut & Pineapple Cooler is a tropical and refreshing beverage that’s perfect for beating the heat. Combining the creamy richness of coconut with the bright sweetness of pineapple, this cooler is both hydrating and delicious.
Ingredients:
- 1 cup fresh pineapple chunks (or frozen)
- 1/2 cup coconut milk (full-fat or light, based on preference)
- 1/4 cup coconut water
- 1-2 tbsp honey or agave syrup (adjust to taste)
- Juice of 1 lime
- 1/2 tsp vanilla extract (optional)
- Ice cubes
- Pineapple slices and mint leaves for garnish (optional)
Instructions:
- Prepare the pineapple:
- If using fresh pineapple, cut it into chunks. If using frozen pineapple, you can use it directly from the freezer.
- Blend the ingredients:
- In a blender, combine the pineapple chunks, coconut milk, coconut water, honey or agave syrup, lime juice, and vanilla extract (if using). Blend until smooth.
- Adjust sweetness:
- Taste the mixture and adjust the sweetness if needed by adding more honey or agave syrup.
- Serve:
- Fill glasses with ice cubes and pour the coconut and pineapple mixture over the ice.
- Garnish with pineapple slices and mint leaves if desired.
- Chill and enjoy:
- Serve immediately for a refreshing drink, or chill in the refrigerator until ready to serve.
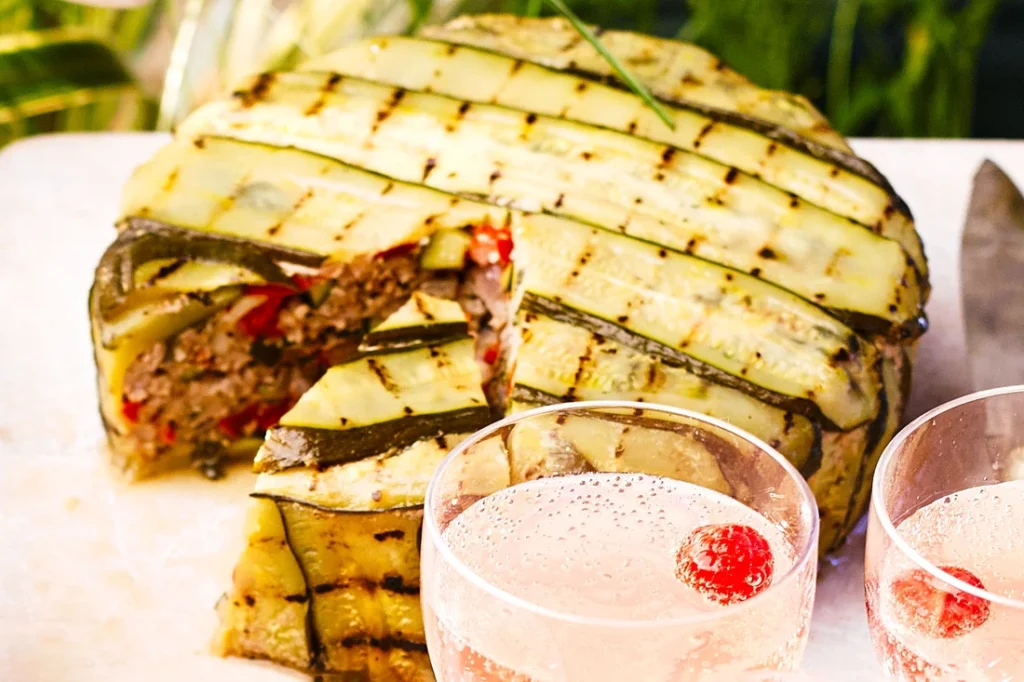
Salmon picnic platter
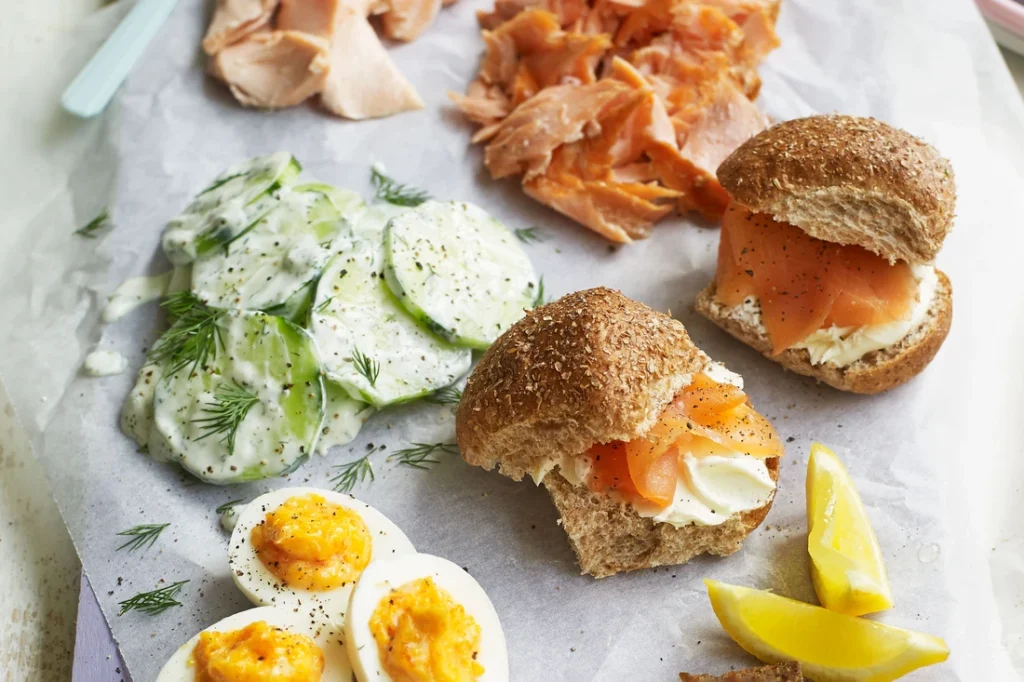
A Salmon Picnic Platter is an elegant and delicious option for outdoor gatherings, offering a variety of flavors and textures that pair beautifully with the rich taste of salmon. This platter includes a mix of smoked salmon, fresh vegetables, and complementary sides, making it both satisfying and easy to enjoy al fresco.
Ingredients:
For the Salmon:
- 8 oz (225g) smoked salmon, sliced
- 1 lemon, cut into wedges
- Fresh dill for garnish (optional)
For the Accompaniments:
- 1 cup cherry tomatoes, halved
- 1 cucumber, sliced
- 1 cup radishes, thinly sliced
- 1 small red onion, thinly sliced
- 1 cup baby carrots
For the Sides:
- 1 cup hummus or tzatziki
- 1 cup cream cheese or herbed spread
- 1 small baguette or a selection of crackers
- 1 cup mixed olives (optional)
- 1/2 cup capers (optional)
For Garnish:
- Fresh herbs (e.g., dill, parsley)
- Lemon wedges
Instructions:
- Arrange the salmon:
- Place the sliced smoked salmon on a large platter or serving board. Garnish with lemon wedges and fresh dill, if using.
- Prepare the vegetables:
- Arrange the cherry tomatoes, cucumber slices, radishes, red onion, and baby carrots around the salmon on the platter.
- Add the sides:
- Place the hummus or tzatziki and cream cheese or herbed spread in small bowls and arrange them on the platter.
- Slice the baguette and arrange the slices or crackers around the spreads.
- Add mixed olives and capers to the platter if using.
- Garnish and serve:
- Garnish the platter with fresh herbs and additional lemon wedges if desired.
- Serve immediately, or cover and refrigerate until ready to serve.
Pastry-less pork pie
A Pastry-Less Pork Pie offers a lighter take on the traditional pork pie by eliminating the pastry crust while still delivering rich, savory flavors. This version is great for those looking to reduce carbs or simply enjoy a different twist on a classic.
Ingredients:
For the Filling:
- 1 lb (450g) ground pork
- 1/2 lb (225g) pork shoulder, finely chopped
- 1/2 cup (75g) breadcrumbs
- 1/2 cup (120ml) chicken or vegetable stock
- 1/4 cup (60ml) white wine or dry cider (optional)
- 1/2 onion, finely chopped
- 2 cloves garlic, minced
- 1 tsp dried thyme
- 1/2 tsp dried sage
- 1/4 tsp ground nutmeg
- 1/4 tsp ground black pepper
- 1 tsp salt
- 1 large egg, beaten (for brushing)
For the Jelly (Optional):
- 1 cup (240ml) chicken or vegetable stock
- 1 tbsp gelatin powder
- 1 tbsp white wine or dry cider (optional)
Instructions:
- Preheat the oven:
- Preheat your oven to 375°F (190°C).
- Prepare the filling:
- In a large mixing bowl, combine the ground pork, finely chopped pork shoulder, breadcrumbs, chicken or vegetable stock, white wine or dry cider (if using), onion, garlic, dried thyme, dried sage, ground nutmeg, black pepper, and salt. Mix until well combined.
- Shape the pie:
- Transfer the filling mixture to a greased 9-inch (23 cm) pie dish or similar ovenproof dish. Press the mixture down evenly.
- Bake:
- Brush the top of the pork mixture with the beaten egg.
- Bake in the preheated oven for 45-55 minutes, or until the pie is cooked through and the top is golden brown.
- Prepare the jelly (optional):
- If using, heat the chicken or vegetable stock in a small saucepan until hot but not boiling.
- Sprinkle the gelatin powder over the hot stock and stir until dissolved. Add the white wine or dry cider if using.
- Pour the gelatin mixture over the baked pork pie once it has cooled slightly, and let it set in the refrigerator for a few hours or until firm.
- Cool and serve:
- Allow the pie to cool slightly before slicing.
- Serve warm or at room temperature.
Cheese & pesto whirls
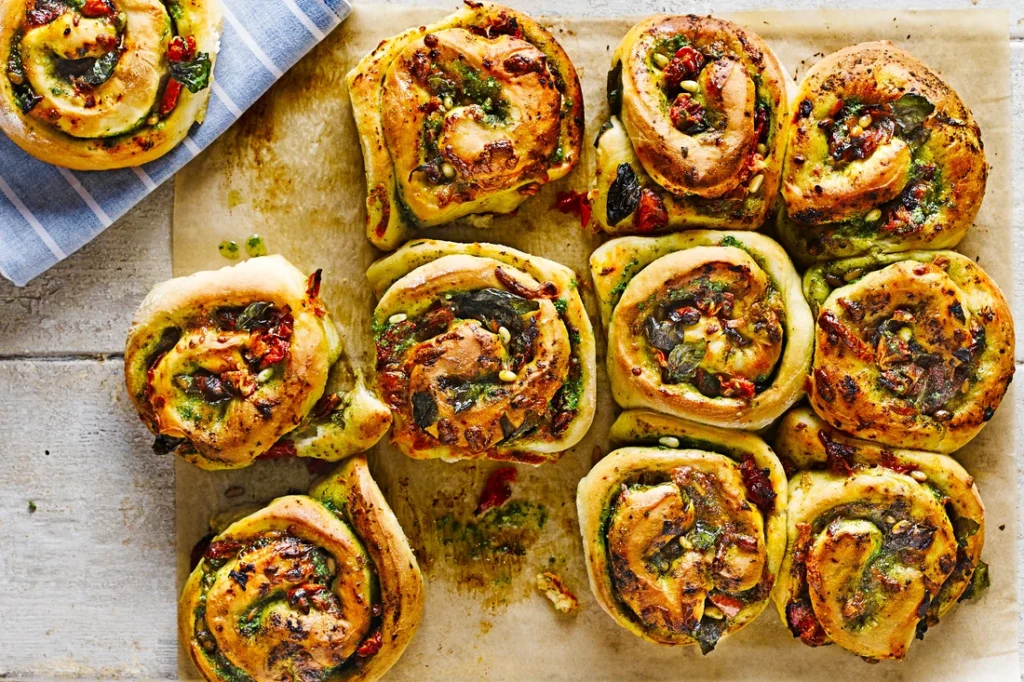
Cheese & Pesto Whirls are a delicious and easy-to-make appetizer or snack that combines flaky puff pastry with savory cheese and aromatic pesto. Perfect for entertaining or just a tasty treat, these whirls are sure to be a hit!
Ingredients:
- 1 sheet (about 250g) puff pastry, thawed
- 1/4 cup (60g) pesto (store-bought or homemade)
- 1 cup (100g) shredded cheese (such as cheddar, mozzarella, or a blend)
- 1 egg, beaten (for brushing)
- Salt and pepper to taste
Instructions:
- Preheat the oven:
- Preheat your oven to 375°F (190°C). Line a baking sheet with parchment paper.
- Prepare the pastry:
- On a lightly floured surface, roll out the puff pastry sheet to smooth any creases.
- Spread the pesto:
- Evenly spread the pesto over the puff pastry, leaving a small border around the edges.
- Add the cheese:
- Sprinkle the shredded cheese evenly over the pesto layer.
- Roll and cut:
- Carefully roll up the puff pastry sheet from one edge to the other, forming a tight log or cylinder.
- Slice the rolled pastry into 1/2-inch (1.5 cm) thick slices and arrange them on the prepared baking sheet.
- Brush and season:
- Brush the tops of the whirls with the beaten egg to give them a golden color when baked.
- Season with a pinch of salt and pepper, if desired.
- Bake:
- Bake in the preheated oven for 15-20 minutes, or until the whirls are golden brown and puffed up.
- Cool and serve:
- Allow the whirls to cool slightly before serving. Enjoy warm or at room temperature.