discovery-listicles
10 Stunning Cookie Cake Designs to Impress Your Guests

A beautifully decorated cookie cake is not only a delightful treat but also a showstopping centerpiece for any celebration. Whether for birthdays, holidays, or special gatherings, a well-designed cookie cake can leave a lasting impression on your guests. To help you elevate your baking skills, we’ve curated ten stunning cookie cake designs that are sure to captivate and impress. These creative ideas range from elegant and classic to fun and whimsical, offering a variety of styles to suit different occasions. With these designs, you can transform a simple cookie cake into a memorable masterpiece that will wow your guests.
Cookie Cake
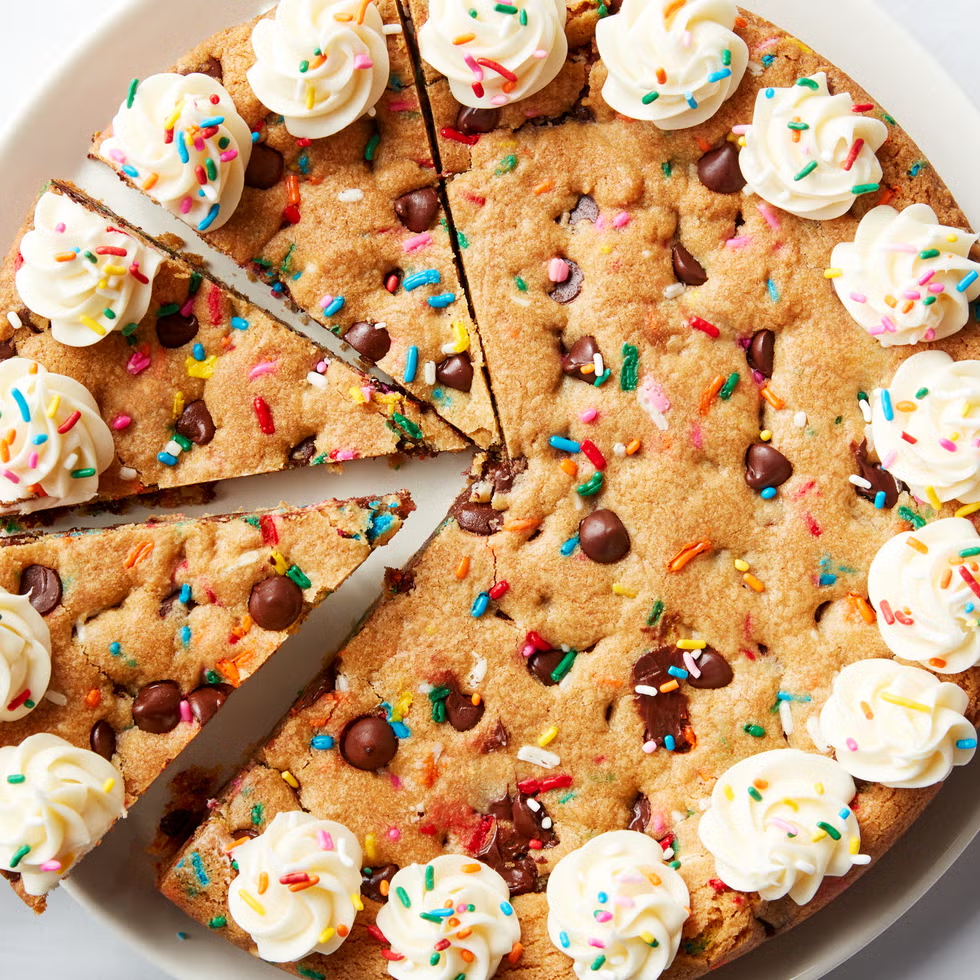
This Cookie Cake is the perfect fusion of a soft, chewy cookie and a celebratory cake. It’s quick to make, customizable with your favorite add-ins, and topped with a rich buttercream frosting for that classic party feel. Ideal for birthdays or any fun occasion!
Ingredients
1/2 c. (1 stick) butter, softened
3/4 c. packed brown sugar
1/4 c. granulated sugar
1 large egg
2 tsp. pure vanilla extract
1 1/2 c. all-purpose flour
1 tsp. baking soda
1/2 tsp. kosher salt
1 c. semi- sweet chocolate chips (plus more for sprinkling)
1/4 c. rainbow sprinkles (plus more for sprinkling)
1 c. vanilla frosting
Directions
Step 1
Preheat oven to 350° and line a 9″ round cake pan with parchment paper. Grease with cooking spray. In a large bowl using a hand mixer, beat butter and sugars until light and fluffy. Add the egg and beat until incorporated. Stir in vanilla. Add flour, baking soda, and salt and mix on low until just combined. Fold in chocolate chips and rainbow sprinkles.
Step 2
Press cookie dough into an even layer in the prepared pan. Top with more chocolate chips and sprinkles, if desired. Bake until the cookie is golden, about 25 to 30 minutes. Let cool in pan for 15 minutes then transfer cake to a cooling rack to cool completely.
Step 3
Transfer frosting to a piping bag fit with a large star tip. Pipe frosting around the edge of the cooled cookie cake. Slice into wedges.
Number or Letter Cookie Cake
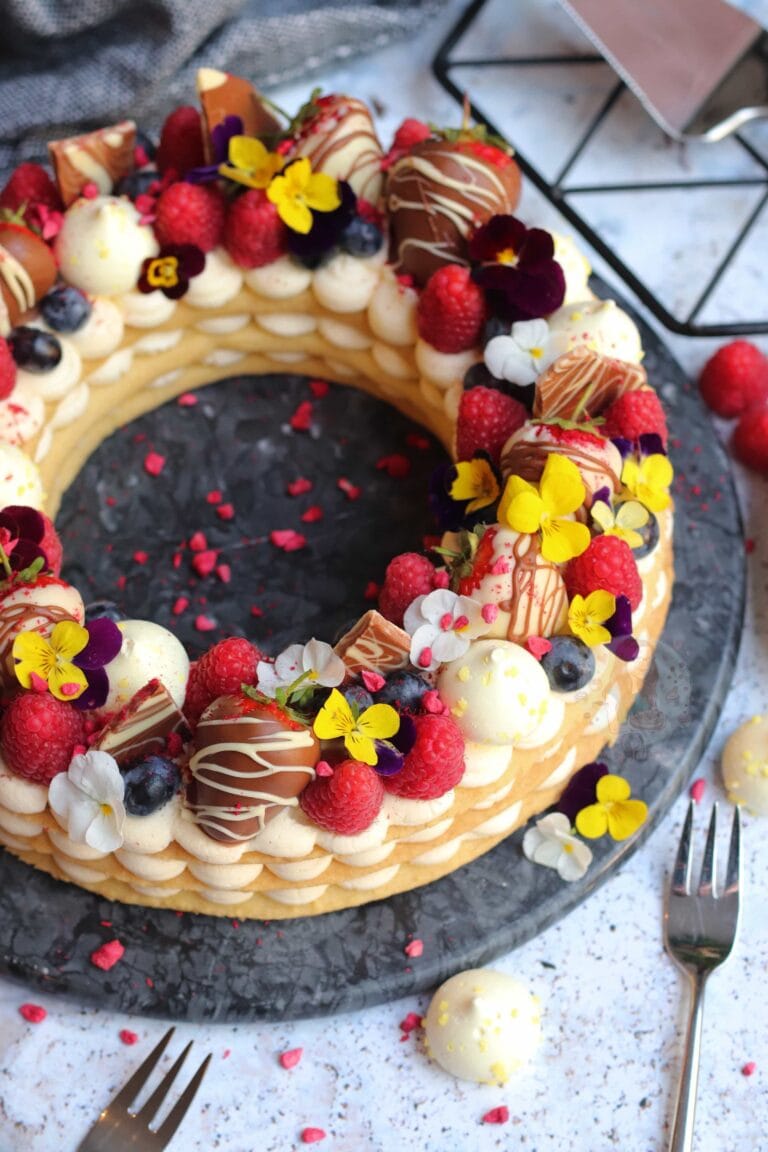
A Number or Letter Cookie Cake is an elegant and trendy dessert that combines layers of crisp cookie dough with luscious fillings like whipped cream, buttercream, or ganache. Perfect for celebrating birthdays, anniversaries, or any milestone, this customizable cake is shaped into numbers or letters and beautifully decorated with fresh fruits, flowers, macarons, or candies.
Ingredients
For the Cookie Dough
1 cup (230g) unsalted butter, softened
1 cup (200g) powdered sugar
1 large egg, room temperature
2 tsp vanilla extract (or almond extract)
2 ½ cups (310g) all-purpose flour
½ tsp salt
For the Filling
1 ½ cups (360ml) heavy whipping cream
¼ cup (50g) powdered sugar
1 tsp vanilla extract (or almond extract)
Optional: cream cheese or mascarpone for added richness
For Decorating
Fresh fruits (strawberries, raspberries, blueberries)
Macarons, meringues, or mini cookies
Edible flowers or herbs
Sprinkles, chocolates, or candies
Additional fillings like jam or Nutella (optional)
Instructions
Step 1
Prepare the Cookie Dough
1. Mix the butter and sugar: In a large bowl, beat the softened butter and powdered sugar together until light and fluffy (2-3 minutes).
2. Add the egg and vanilla: Mix in the egg and vanilla extract until fully incorporated.
3. Add the dry ingredients: Gradually add the flour and salt, mixing until the dough comes together.
4. Chill the dough: Divide the dough in half, wrap each half in plastic wrap, and refrigerate for at least 30 minutes.
Step 2
Cut and Bake the Cookie Layers
1. Preheat the oven: Preheat the oven to 350°F (175°C) and line baking sheets with parchment paper.
2. Roll out the dough: Roll the chilled dough out to about ¼-inch thickness on a floured surface.
3. Cut the shape: Using a template (print out the desired letter or number and cut around it), cut the dough into the desired number or letter shape. Repeat with the second portion of dough.
4. Bake: Transfer the shapes to the prepared baking sheets and bake for 10-12 minutes, or until the edges are golden. Let the cookies cool completely on the baking sheet before assembling.
Step 3
Prepare the Whipped Cream Filling
1. Whip the cream: In a large bowl, beat the heavy whipping cream, powdered sugar, and vanilla extract on high speed until stiff peaks form. For a thicker filling, fold in cream cheese or mascarpone.
Step 4
Assemble the Cookie Cake
1. Layer the cookies: Place the first cookie layer on a serving platter. Transfer the whipped cream filling to a piping bag fitted with a round or star tip.
2. Pipe the filling: Pipe dollops of cream evenly across the top of the first cookie layer.
3. Add the second layer: Gently place the second cookie layer on top and pipe another layer of cream on the surface.
4. Decorate: Decorate the top with fresh fruits, macarons, meringues, edible flowers, or other decorations as desired.
Step 5
Serve and Enjoy
1. Chill and serve: Refrigerate the assembled cake for about 30 minutes to help it set before slicing and serving.
Emoji Cookie Cake
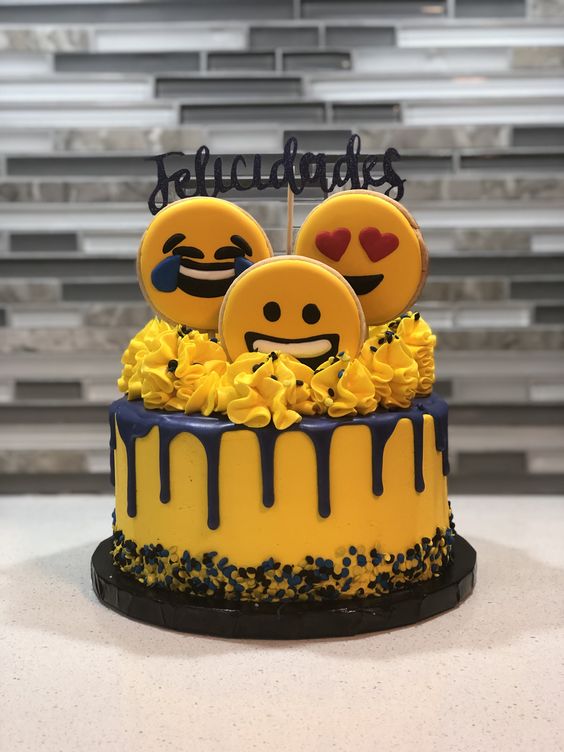
An Emoji Cookie Cake is a fun, playful dessert perfect for birthday parties or celebrations. Shaped like your favorite emoji, this cake combines the flavor of a giant cookie with colorful decorations that bring the emoji to life. You can use a classic smiley, heart eyes, or any emoji that suits the occasion!
Ingredients
For the Cookie Cake
1 cup (230g) unsalted butter, softened
1 cup (200g) granulated sugar
½ cup (100g) brown sugar
2 large eggs, room temperature
2 tsp vanilla extract
2 ½ cups (310g) all-purpose flour
1 tsp baking soda
½ tsp salt
1 ½ cups (270g) chocolate chips or sprinkles (optional)
For the Decorations
Yellow food coloring (for the emoji base)
Black, red, and white food coloring for details (or colored fondant for easier decoration)
Buttercream frosting or royal icing
Piping bags with small round tips
Edible candy eyes, hearts, or other decorations depending on the emoji
Instructions
Step 1
Make the Cookie Cake
1. Preheat the oven: Preheat your oven to 350°F (175°C). Grease a large round cake pan (or pizza pan) to create the cookie base.
2. Cream butter and sugars: In a large bowl, beat together the softened butter, granulated sugar, and brown sugar until light and fluffy (about 2-3 minutes).
3. Add eggs and vanilla: Mix in the eggs one at a time, followed by the vanilla extract.
4. Combine dry ingredients: In another bowl, whisk together the flour, baking soda, and salt. Gradually add the dry ingredients to the wet mixture, mixing until just combined.
5. Optional add-ins: Fold in chocolate chips or sprinkles if desired.
6. Shape the cookie: Press the cookie dough into the prepared round pan, smoothing it into an even layer.
7. Bake: Bake for 20-25 minutes, or until the edges are golden and the center is set. Let the cookie cool completely before decorating.
Step 2
Prepare the Frosting or Icing
1. Make the buttercream or royal icing: In a large bowl, beat softened butter with powdered sugar, adding a little milk or cream until smooth. For royal icing, mix powdered sugar with a little water until it reaches the right consistency.
2. Color the frosting: Divide the frosting into separate bowls and color one portion with yellow food coloring for the base of the emoji. Use black, red, and white food coloring for the details.
Step 3
1. Frost the base: Once the cookie has cooled, spread the yellow frosting evenly over the entire surface of the emoji face.
2. Add details: Using piping bags, carefully pipe the eyes, mouth, and any other features (like heart eyes, a smile, or sunglasses) with the appropriate colored frostings. If using fondant, cut out shapes and place them on the cookie.
3. Finishing touches: Add edible candy eyes or other decorations to enhance the emoji look.
Step 4
1. Chill and set: Allow the frosting to set slightly before slicing.
2. Slice and serve: Cut into slices and enjoy your fun, emoji-inspired treat!
Geometric Cookie Cake
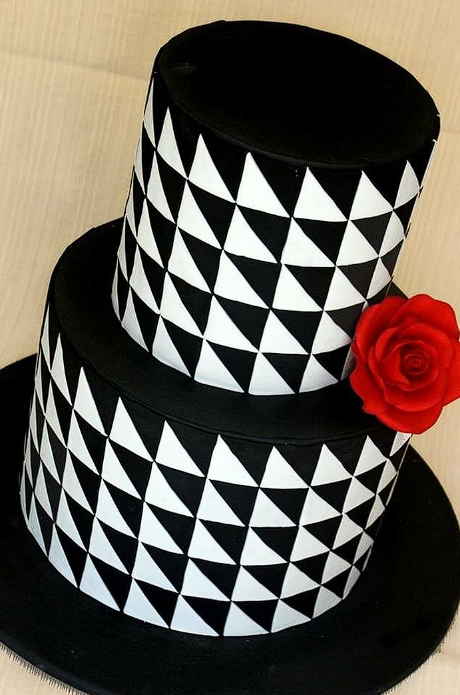
A Geometric Cookie Cake is a modern and stylish dessert that combines delicious cookie layers with bold, geometric designs. This cake is perfect for anyone who loves contemporary aesthetics and wants to add a chic touch to their celebration. The cookie cake can be decorated with colorful shapes, sharp lines, and creative patterns, making it a striking centerpiece for any party.
Ingredients
For the Cookie Dough
1 cup (230g) unsalted butter, softened
1 cup (200g) powdered sugar
1 large egg, room temperature
2 tsp vanilla extract
2 ½ cups (310g) all-purpose flour
½ tsp salt
For the Filling
1 ½ cups (360ml) heavy whipping cream
¼ cup (50g) powdered sugar
1 tsp vanilla extract
Optional: cream cheese or mascarpone for a thicker filling
For the Decorations
Fondant or royal icing in various colors (for geometric shapes)
Piping bags with small round tips for icing details
Edible gold leaf or metallic sprinkles for an elegant touch
Food-safe rulers and cutters to create precise shapes
Instructions
Step 1
Prepare the Cookie Dough
1. Cream the butter and sugar: In a large bowl, beat the softened butter and powdered sugar until light and fluffy (about 2-3 minutes).
2. Add egg and vanilla: Mix in the egg and vanilla extract until fully incorporated.
3. Add dry ingredients: Gradually add the flour and salt, mixing until a soft dough forms.
4. Chill the dough: Divide the dough into two portions, wrap it in plastic wrap, and refrigerate for at least 30 minutes.
Step 2
Cut and Bake the Cookie Layers
1. Preheat the oven: Preheat your oven to 350°F (175°C) and line baking sheets with parchment paper.
2. Roll out the dough: On a floured surface, roll out the dough to about ¼-inch thickness.
3. Cut shapes: Using a circle or square template (for the base shape), cut the dough into the desired geometric shape. You can create a single-layer or multi-layer cake.
4. Bake: Bake for 10-12 minutes, or until the edges are golden. Let the cookies cool completely on the baking sheets.
Step 3
Prepare the Whipped Cream Filling
1. Whip the cream: In a large bowl, beat the heavy whipping cream, powdered sugar, and vanilla extract on high speed until stiff peaks form. Add cream cheese or mascarpone if a thicker filling is preferred.
Step 4
Assemble the Cookie Cake
1. Layer the cookies: Place the first cookie layer on a serving platter. Use a piping bag to pipe dollops of whipped cream filling across the surface.
2. Add the second layer: Gently place the second cookie layer on top and pipe more filling if you’re making a multi-layered cake.
Step 5
Create a Geometric Design
1. Use fondant or icing: Roll out different colors of fondant or use colored royal icing to create geometric shapes such as triangles, rectangles, or hexagons.
2. Apply the shapes: Arrange the fondant or icing shapes on top of the cookie cake, layering them in a stylish, geometric pattern. You can mix and match colors for a bold effect.
3. Add metallic accents: Use edible gold leaf or metallic sprinkles to add an extra layer of sophistication.
Step 6
Serve and Enjoy
1. Chill and set: Let the cookie cake set in the refrigerator for 30 minutes to allow the layers to firm up before serving.
2. Slice and serve: Cut into slices and enjoy your stunning geometric-themed dessert.
Seasonal Themed Cookie Cake
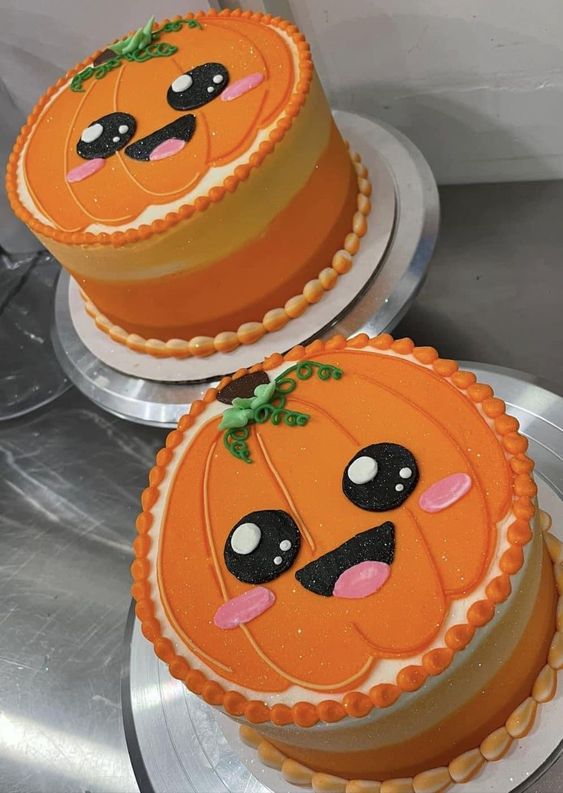
A Seasonal Themed Cookie Cake is a delightful dessert that celebrates the essence of each season through creative flavors, colors, and decorations. Whether it’s spring blossoms, summer sunshine, autumn harvests, or winter wonderlands, this cake can be customized to reflect the season’s unique charm.
Ingredients
1 cup butter, softened
1 cup sugar
1 egg
2 tsp vanilla extract
2 ½ cups flour
1 tsp baking powder
Optional: spices or zests for flavor
Filling
1 ½ cups heavy cream
¼ cup powdered sugar
1 tsp vanilla extract
Optional: seasonal flavorings (cinnamon, lemon zest)
Decorations
Seasonal fruits, candy, or edible flowers
Fondant or icing
Sprinkles or edible glitter
Instructions
1. Prepare the Dough: Cream butter and sugar, then add egg and vanilla. Mix in flour, baking powder, and salt. Chill the dough for 30 minutes.
2. Cut and Bake: Preheat to 350°F. Roll dough to ¼ inch thickness, cut seasonal shapes, and bake for 10-12 minutes.
3. Prepare the Filling: Whip cream, sugar, and vanilla until stiff peaks form. Add optional seasonal flavors.
4. Assemble the Cake: Layer cookies with piped cream filling. Add seasonal decorations like fruits, icing, or sprinkles.
5. Serve: Chill, slice, and enjoy your festive cookie cake.
Marble Cookie Cake
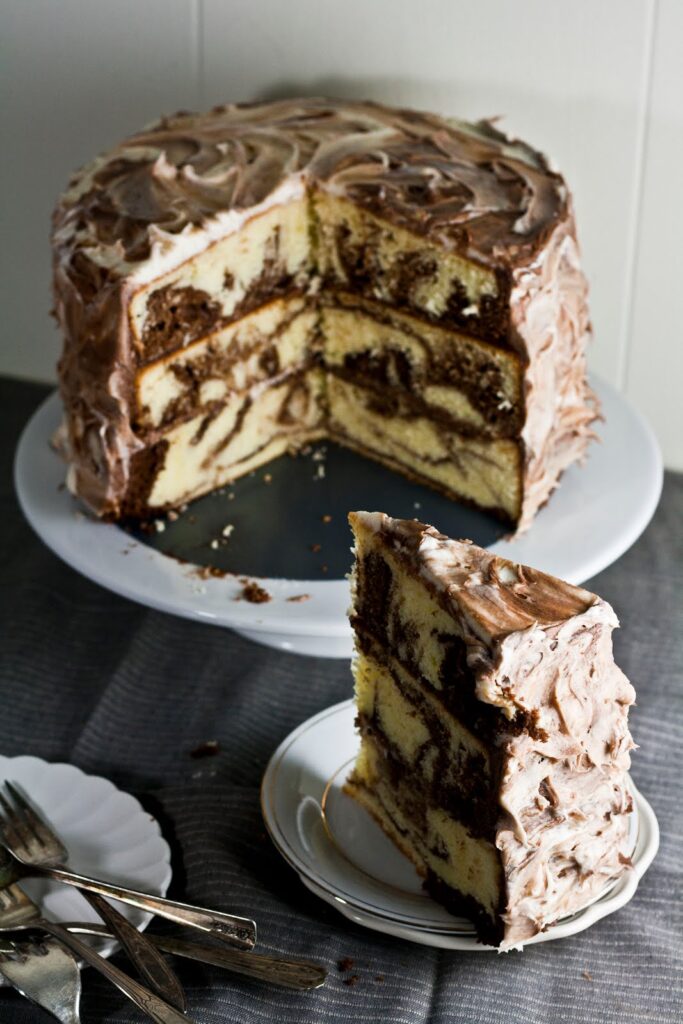
This Marble Cookie Cake is a delightful fusion of two classic flavors—rich chocolate and sweet vanilla—swirled together to create a visually stunning and mouthwatering dessert. Soft and chewy, it’s perfect for any celebration or as a special treat to enjoy with family and friends.
Ingredients
1 cup butter (softened)
1 cup granulated sugar
1 cup brown sugar
2 large eggs
2 1/4 cups all-purpose flour
1 tsp baking powder
1/2 tsp baking soda
1/2 tsp salt
1 cup chocolate chips
1/2 cup cocoa powder
Instructions
1. Preheat oven to 350°F (175°C). Grease a 9-inch round cake pan.
2. Cream butter and sugars until light and fluffy. Beat in eggs one at a time.
3. Mix flour, baking powder, baking soda, and salt in a bowl. Gradually add to butter mixture, mixing until combined.
4. Divide the batter in half. Stir cocoa powder into one half.
5. Spoon dollops of both batters into the pan. Swirl with a knife to marble.
6. Bake for 25-30 minutes, or until a toothpick comes out clean.
7. Cool in the pan for 10 minutes, then transfer to a wire rack to cool completely.
Cookie Cake Sandwich
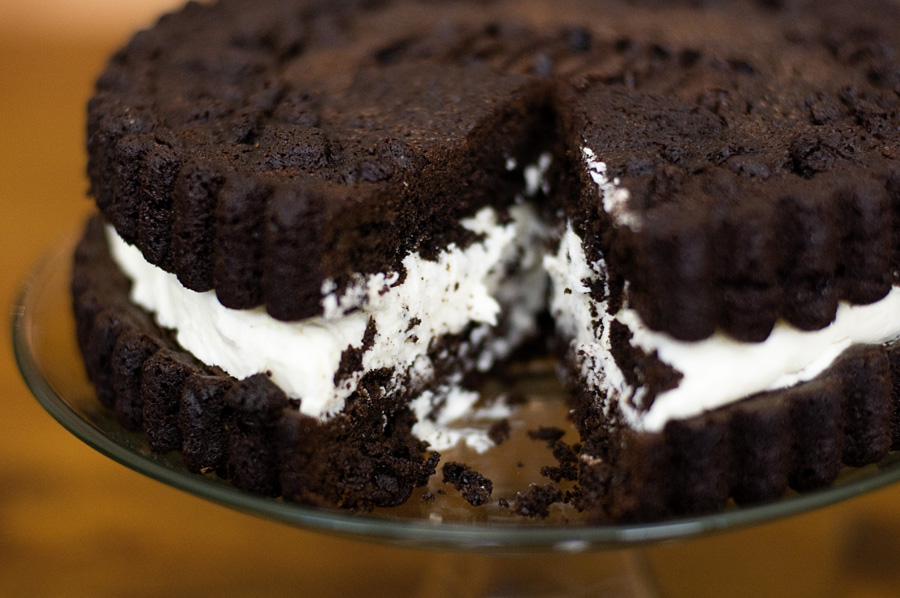
Elevate your dessert game with this Cookie Cake Sandwich! Combining two indulgent cookie cakes with a luscious filling in between, this treat offers the perfect balance of chewy, soft cookies and creamy, flavorful goodness. Ideal for sharing or savoring on your own, it’s a fun and delicious way to enjoy classic cookie flavors in a whole new way.
Ingredients
1 large cookie cake (store-bought or homemade, see above)
1 pint ice cream (any flavor you like)
Instructions
1. Prepare the cookie cake by either baking it or buying a pre-made one. Let it cool completely.
2. Soften the ice cream slightly if it’s too hard to scoop.
3. Cut the cookie cake into two equal layers.
4. Spread a generous layer of ice cream on one half of the cookie cake.
5. Top with the other cookie cake layer.
6. Freeze for about 1 hour to firm up before slicing and serving.
Chocolate Drip Cookie Cake
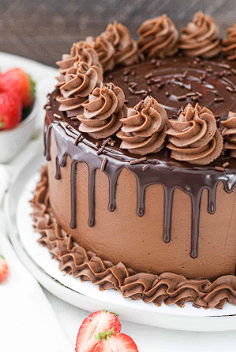
This Fruit-Topped Cookie Cake is a refreshing twist on the classic cookie cake, combining the soft, chewy base of a giant cookie with the vibrant flavors of fresh fruit. Finished with a light, creamy frosting and an assortment of colorful berries or tropical fruits, it’s a beautiful and delicious dessert that’s perfect for any gathering.
Ingredients
1 cup butter (softened)
1 cup granulated sugar
1 cup brown sugar
2 large eggs
2 1/4 cups all-purpose flour
1 tsp baking powder
1/2 tsp baking soda
1/2 tsp salt
1 cup chocolate chips
For Chocolate Drip
1/2 cup heavy cream
1 cup semi-sweet chocolate chips
Instructions
1. Preheat oven to 350°F (175°C). Grease a 9-inch round cake pan.
2. Cream butter and sugars until light and fluffy. Beat in eggs one at a time.
3. Mix flour, baking powder, baking soda, and salt. Gradually add to butter mixture. Stir in chocolate chips.
4. Press dough into the cake pan evenly. Bake for 25-30 minutes or until golden. Cool completely.
For the Chocolate Drip
5. Heat cream in a small saucepan until just simmering. Pour over the chocolate chips and let sit for 2 minutes.
6. Whisk until smooth, then let cool slightly to thicken.
7. Drizzle chocolate over the cooled cookie cake, letting it drip down the sides.
Fruit-Topped Cookie Cake
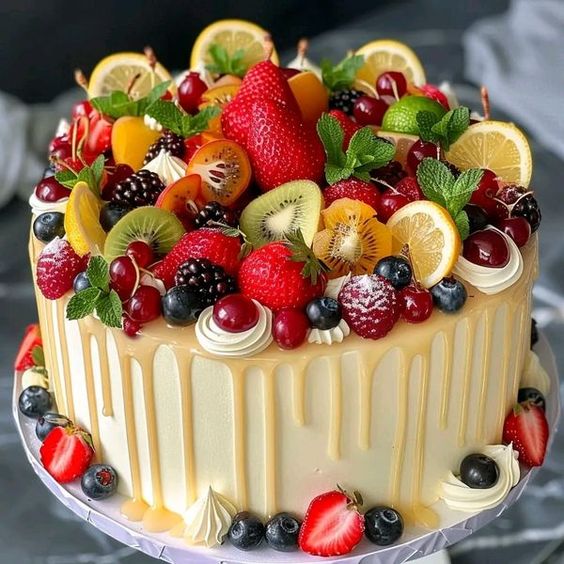
This Fruit-Topped Cookie Cake is a refreshing twist on the classic cookie cake, combining the soft, chewy base of a giant cookie with the vibrant flavors of fresh fruit. Finished with a light, creamy frosting and an assortment of colorful berries or tropical fruits, it’s a beautiful and delicious dessert that’s perfect for any gathering.
Ingredients
1 cup butter (softened)
1 cup granulated sugar
1 cup brown sugar
2 large eggs
2 1/4 cups all-purpose flour
1 tsp baking powder
1/2 tsp baking soda
1/2 tsp salt
1 cup chocolate chips (optional)
For Topping
1 cup whipped cream (or cream cheese frosting)
Fresh fruit (strawberries, blueberries, kiwi, etc.)
Instructions
1. Preheat oven to 350°F (175°C). Grease a 9-inch round cake pan.
2. Cream butter and sugars until light and fluffy. Beat in eggs one at a time.
3. Mix flour, baking powder, baking soda, and salt. Gradually add to the butter mixture. Stir in chocolate chips if using.
4. Press the dough into the pan evenly. Bake for 25-30 minutes or until golden. Cool completely.
For the Topping
5. Spread whipped cream or cream cheese frosting on top of the cooled cookie cake.
6. Arrange fresh fruit on top in a decorative pattern.
Animal-Shaped Cookie Cake

Bring some fun to your celebrations with this Animal-Shaped Cookie Cake! Crafted in the shape of your favorite animals, this soft, chewy cookie cake is both playful and delicious. Perfect for kids’ parties or themed events, it adds a creative and sweet touch to any occasion, making it a treat that’s as delightful to look at as it is to eat.
Ingredients
1 cup butter (softened)
1 cup granulated sugar
1 cup brown sugar
2 large eggs
2 1/4 cups all-purpose flour
1 tsp baking powder
1/2 tsp baking soda
1/2 tsp salt
1 cup chocolate chips (optional)
Instructions
1. Preheat oven to 350°F (175°C). Grease a large baking sheet or shape-specific cookie mold.
2. Cream butter and sugars until light and fluffy. Beat in eggs one at a time.
3. Mix flour, baking powder, baking soda, and salt. Gradually add to the butter mixture. Stir in chocolate chips if using.
4. Shape the dough: Either use a large animal-shaped cookie cutter, or freehand an animal shape (like a bear, cat, or dinosaur) by pressing the dough onto a lined baking sheet.
5. Bake for 25-30 minutes or until golden. Cool completely.
Optional Decoration
6. Frosting: Pipe frosting to outline or add details like eyes, nose, or fur.
7. Candy/Chocolate: Use candies or chocolate chips for eyes, nose, and other features.